

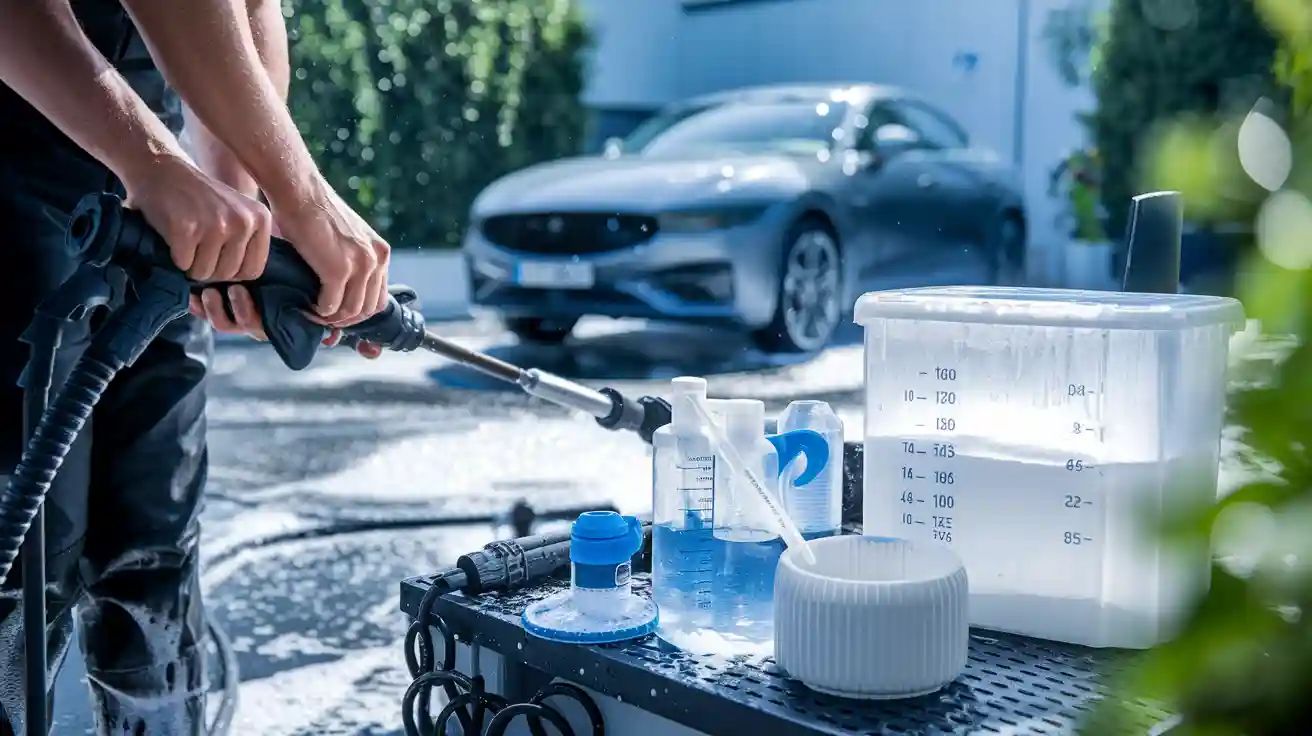
Getting your car sparkling clean starts with the right tools and knowing the proper procedure. When you use quality equipment and follow the instructions, you get better results with snow foam for car cleaning. Studies show that changing your mixing methods can make a huge difference—sometimes up to 155% in foam strength and nearly 50% in density.
Different lances and foam cannons give different results on your car.
Adjusting dilution, water pressure, and nozzle size helps the foam stick longer and clean better.
If you want a simple step-by-step guide on how to snow foam a car, you are in the right place.
Key Takeaways
Pick a snow foam lance that matches your pressure washer. Make sure it makes thick and even foam for a good clean. Mix the snow foam solution with water as the instructions say. Change the amount if your car is very dirty. Spray the foam on the car from the bottom up. Move your hand slowly and cover every part by going over it again. Let the foam stay for five to ten minutes. Do not let it dry on the car. Rinse the foam off from the top down to stop marks. Check your equipment often and clean it after you use it. Store it the right way so it does not get damaged.
Equipment Needed
Snow Foam Lance
You need a good snow foam lance to get thick, clinging foam on your car. This tool attaches to your pressure washer and mixes the snow foam solution with water. Not all lances work the same. Some give you better foam and last longer. Take a look at this table to compare popular models:
Snow Foam Lance Model |
Rating (Stars) |
Key Features & Efficacy Highlights |
|---|---|---|
Autoglym Polar Blaster |
5 |
Heavy-duty build, excellent foam longevity, easy fitting, long-lasting foam, efficient use of foam solution. |
Qooltek Adjustable Foam Cannon |
4 |
Budget-friendly, thick and durable foam, fits Karcher washers, wide fan spray, 24-month warranty. |
BigBoi FoamRpro |
4 |
Multiple spray settings, good coverage, fluffy and lasting foam, wide compatibility. |
Car Gods Snow Foam Cannon |
3 |
Decent foam, standard spray, no measurement markings, lacks quick-release fitting. |
Sleekax Snow Foam Lance |
3 |
Sensitive mix adjuster, uses solution quickly, good foam but less efficient. |
Ultimate Finish Snow Foam Cannon |
3 |
Wide-neck bottle, quick-release, prone to leaking. |
Karcher FJ6 Foam Nozzle |
2 |
Small bottle, lighter build, less lasting foam, rotates 360°, cheapest option. |
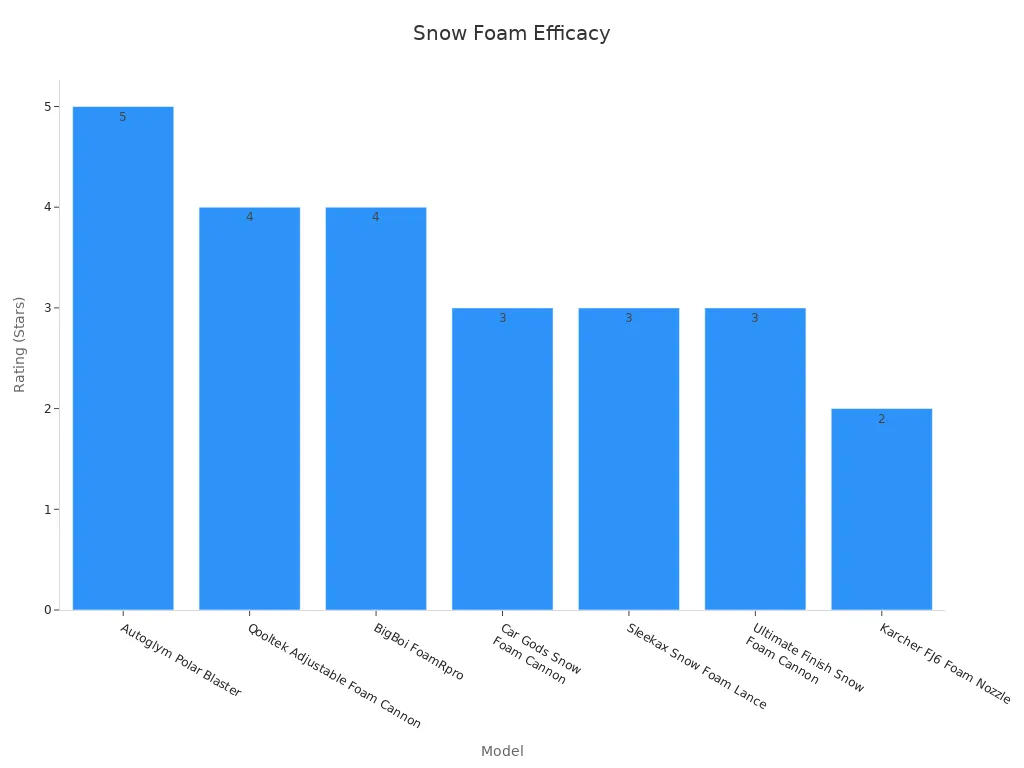
If you want the best snow foam, pick a lance that matches your pressure washer and gives you thick, even coverage. Many car owners love the Autoglym Polar Blaster for its strong build and foam quality.
Pressure Washer
A pressure washer gives your foam cannon the power it needs. You want a washer that is easy to use and strong enough for a foam cannon car wash. The PowRyte Electric Pressure Washer stands out with its 3800 PSI power and simple setup. Many users say it makes thick, long-lasting foam and works well with different foam cannons. You can set it up quickly and use it for more than just your car.
Tip: Always check that your pressure washer fits your snow foam lance. Most lances have adaptors for popular brands.
Snow Foam Solution
You need a quality snow foam solution to get the best results. Some solutions make thicker foam, while others rinse off more easily. Always read the label for mixing ratios. Try a few brands to see which one works best for your car and local water type. The right solution helps your foam cannon cover every part of your car with a thick layer.
Accessories
A few extra items make the job easier. You might want:
Microfibre wash mitts for gentle cleaning
Buckets for rinsing
Soft brushes for wheels and trims
Extension hoses for hard-to-reach spots
These accessories help you get a spotless finish and protect your car’s paintwork.
Preparation Steps
Before you start the snow foam stage, you need to get your equipment ready. This step-by-step guide will help you avoid problems and keep your car safe.
Inspect Equipment
You should always check your gear before you begin. A quick inspection can save you from bigger issues later. Here’s what you need to look for:
Cracks or leaks in hoses and bottles
Blocked nozzles or filters
Loose fittings or worn seals
Signs of rust or damage on metal parts
Did you know? In 2016, there were 4,693 deaths in private industry, with about 21% in construction. Many of these accidents happened because people skipped equipment checks. Safety rules say you must inspect all heavy equipment before use. Working brakes, lights, and warning devices are not just for big machines—they matter for your cleaning tools too.
A quick check keeps you and your car safe. It also helps your snow foam lance work better.
Assemble Lance
Now, put your snow foam lance together. Most lances come in a few parts: the bottle, the mixing chamber, and the nozzle. Screw the bottle onto the chamber. Attach the nozzle firmly. Make sure all seals are tight so you don’t lose pressure or leak foam. If your lance has adjustable settings, set them to the middle for your first try. You can tweak them later for thicker foam.
Connect Washer
Next, connect your pressure washer to the lance. Always follow the instructions for your model. A good connection stops leaks and keeps the pressure strong. Case studies show that improper connection can cause damage—not just to your equipment, but to your car or even yourself. For example, one report described serious injuries from high-pressure washers used incorrectly. Another study found that the wrong setup could ruin delicate surfaces, like wood or paintwork.
Take your time with this step. A secure connection means you’re ready for the snow foam stage and a spotless car.
Mixing Ratios
Getting the right mix ratio is the secret to creating thick suds that cling to your car and lift away dirt. If you want the best snow foam, you need to pay attention to how much soap to use and how you combine it with water. Let’s break down the steps so you get thick foam every time.
Water and Solution
You might wonder, “How much soap should I use for my snow foam?” The answer depends on your product and your setup. Most snow foam solutions work well with a mix ratio between 1:3 and 1:10. That means you add one part snow foam solution to three or up to ten parts water. Some brands suggest a stronger mix for extra dirty cars, while others recommend a lighter mix for regular washes.
Always check the instructions on your snow foam bottle. Manufacturers test their products to find the best mix ratio for thick suds and safe cleaning.
Here’s a quick table to help you decide:
Mix Ratio (Solution:Water) |
When to Use |
Resulting Foam |
|---|---|---|
1:3 |
Heavy dirt, winter grime |
Very thick suds |
1:5 |
Regular washes, moderate dirt |
Thick suds |
1:10 |
Light cleaning, maintenance washes |
Lighter foam |
If you want to experiment, start with the middle setting and adjust until you see the results you like on your car.
Warm Water Tips
Many people think warm water always makes thicker foam. The truth is a bit more interesting. Laboratory tests show that the initial thickness of foam does not change much with water temperature. Scientists measured foam at different temperatures, from 25 °C to 90 °C, and found the gas volume and bubble density stayed almost the same.
Temperature (°C) |
Gas Volume for Max Foam Height (mL) |
Initial Bubble Density (bubbles/mm²) |
|---|---|---|
25 |
130 |
76 |
50 |
126 |
80 |
75 |
122 |
82 |
90 |
133 |
74 |
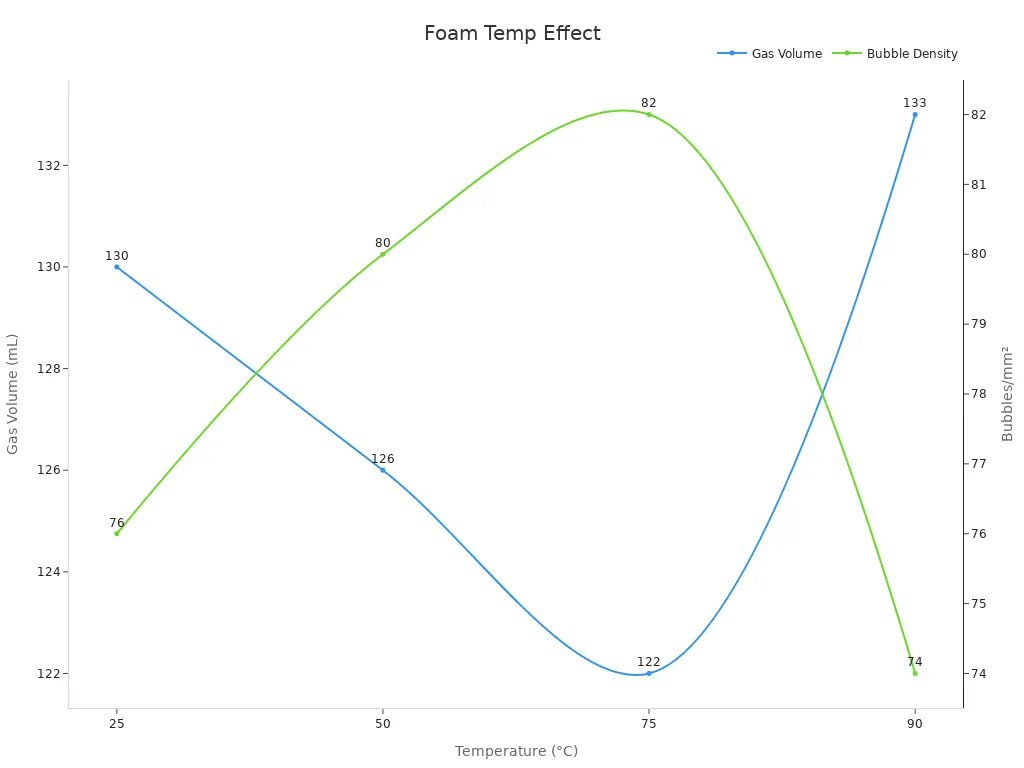
So, what does this mean for your car wash? You can use warm water if you like, but don’t expect it to give you thicker suds right away. However, foam made with water at 50 °C or below tends to last longer on your car. Higher temperatures make the foam break down faster, so you might see the suds slide off sooner if you use very hot water.
Tip: For the longest-lasting thick suds, stick to warm or cool water. Avoid using water that feels too hot to the touch.
Shaking and Combining
Once you’ve measured your snow foam solution and water, you need to mix them well. Pour the water into the bottle first, then add the snow foam solution. This helps reduce bubbles and makes it easier to mix. Screw the lid on tightly.
Give the bottle a gentle shake. You don’t need to go wild—just a few turns will do. This step helps the soap dissolve and gives you even, thick suds when you spray. If you skip this, you might get runny foam or patches with less cleaning power.
Note: Always follow the instructions on your snow foam product. Some brands have special formulas that need a different mix ratio or mixing method.
If you want to get the most out of your snow foam lance, try a few different ratios and see what works best for your car and water type. You’ll soon find the perfect balance for thick foam and a spotless finish.
How to Snow Foam a Car
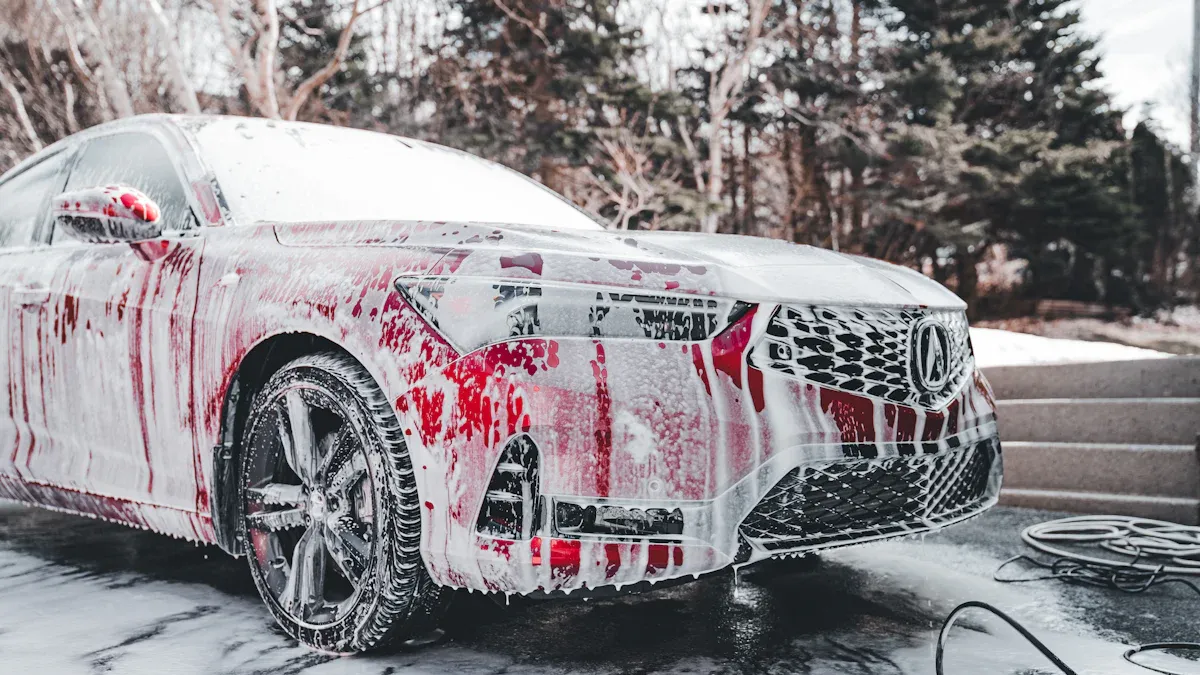
Snow foaming your car can feel like a treat, not a chore. You get to see thick, white suds cover your car, lifting away dirt before you even touch the paint. If you want professional-quality results, you need to follow the right steps. Let’s walk through how to snow foam a car so you get the best clean every time.
How to Apply Snow Foam
You might wonder how to apply snow foam for the best effect. Start by making sure your car is parked in a shaded spot. Direct sunlight can dry the foam too quickly. Attach your snow foam lance to the pressure washer. Give the bottle a gentle shake to mix the solution.
Now, stand about one to two metres from your car. Begin spraying from the bottom and work your way up. This helps the foam cling better and stops streaks. Move the lance in slow, steady motions. Cover the wheels, doors, roof, bonnet, and boot. Don’t forget the mirrors and lower panels. You want every part of your car coated in a thick, even layer.
Tip: Always spray the foam upwards. This lets gravity help the suds stick and soak into the grime.
If you want to know how to use snow foam like a pro, keep your hand steady and overlap each pass. You’ll soon see your car covered in a snowy blanket.
Even Coverage
Getting even coverage is key if you want your car to look spotless. Patchy foam leaves dirt behind. Here’s a simple checklist to help you:
Check your lance settings. Adjust the nozzle for a wide fan spray.
Spray in horizontal lines, then go over again with vertical lines.
Watch for missed spots around badges, handles, and trims.
Use a soft brush for tricky areas if needed.
You can also use this quick table to spot common mistakes:
Problem Area |
What to Do |
|---|---|
Missed corners |
Angle the lance for better reach |
Thin foam spots |
Slow down your spray movement |
Streaks forming |
Re-spray with overlapping passes |
If you follow these tips, you’ll get thick, even foam on every part of your car. That’s how to snow foam a car like the experts.
Dwell Time
Dwell time means how long you let the foam sit on your car. This stage is important. The longer the foam stays, the more dirt it lifts. Most snow foam products work best with a dwell time of five to ten minutes. Check your product label for the exact time.
Note: Never let the foam dry on your car. If it starts to dry, rinse it off straight away.
Watch the foam as it works. You’ll see it change colour as it pulls dirt from the surface. If you want to get the most from the snow foam stage, wait until the foam starts to slide off but is still wet. Then, rinse your car with clean water.
You now know how to snow foam a car from start to finish. You’ve learned how to apply snow foam, how to get even coverage, and how long to let it dwell. With these steps, you’ll get a cleaner car and save time on every wash.
Snow Foam Lance Settings
Adjusting Foam Output
You want your foam cannon to give you the best results every time. The secret lies in adjusting the foam output. Most foam cannons have a dial or knob on top. This lets you control how much snow foam mixes with water. If you turn the dial one way, you get thicker foam. Turn it the other way, and the foam becomes lighter.
Thicker foam sticks to your car for longer. It lifts more dirt and gives you a deeper clean. However, if the foam slides off too quickly or dries before you rinse, you might need to use a lighter mix. Spray pattern tests show that changing the dilution ratio changes how long the foam stays on your car. Thicker foam works well for heavy dirt, but lighter foam can help if you want longer dwell time without the foam sliding away.
You can also adjust the output to match the weather. On a hot day, lighter foam might work better because it dries slower. On a cool day, thicker foam will cling longer. Try different settings to see what works best for your car and your foam cannon use.
Tip: Start with the middle setting on your foam cannon. Adjust up or down until you see the foam you like.
Testing Spray Pattern
Getting the right spray pattern makes a big difference. Most foam cannons let you change the shape of the spray. You can choose a wide fan or a narrow jet. A wide fan covers your car quickly and evenly. A narrow jet gives you more power for tough spots.
Foam testing shows that a good spray pattern helps you get even coverage. Too much foam can be hard to rinse off, while too little might not clean well. You want a balance. Spray a small area first and watch how the foam sticks. If you see thick, even suds, you are on the right track.
Try moving the nozzle and changing the pattern until you find what works for your foam cannon use. You will soon see which setting gives you the best clean with the least effort.
Rinsing and Finishing
Rinse Techniques
You have covered your vehicle in thick foam. Now it is time to rinse. Grab your pressure washer or hose. Start at the top and work your way down. This method helps you push all the loosened dirt off the panels. Use a steady, sweeping motion. Do not rush. Make sure you remove every bit of foam. If you leave any behind, it can dry and leave marks.
Tip: Use a fan spray setting for a gentle but thorough rinse. A jet setting can be too harsh and might push dirt into small gaps.
Check the wheels and lower panels. These areas collect the most grime. Give them extra attention. If you see stubborn spots, go over them again. You want your car to look spotless after every car cleaning routine.
Final Checks
Take a step back and look at your work. Walk around your vehicle. Check for any missed foam or streaks. Sometimes, foam hides in door shuts or around badges. Wipe these areas with a clean microfibre cloth if needed.
Here is a quick checklist to help you finish strong:
Inspect all panels for leftover foam
Check mirrors, trims, and badges
Look for water spots or streaks
Dry with a soft towel if you see any drips
Remember: Consistency is key. When you follow these steps in your car cleaning routine, you get better results every time.
You have now finished the rinsing and final checks. Your vehicle should look clean and ready for the road.
Troubleshooting
Even with the best setup, you might run into a few problems. Don’t worry—most issues have simple fixes. Let’s look at the most common ones and how you can sort them out.
Thin Foam
If your foam looks watery or slides off too quickly, you probably have thin foam. This often happens when the dilution ratio is off. Most snow foam products work best between 1:10 and 1:20, but some need a stronger mix. If you use too much water, the foam gets runny and dries out fast. If you use too much solution, the foam can get too thick and fall off before it cleans. Some brands just don’t make thick foam, no matter how much you use. Try starting with three parts warm water to one part snow foam, then adjust until you see a creamy, shaving-cream-like texture. Always check the label for the right mix. You might need to experiment a bit to find what works for your setup.
Tip: If your foam is still thin, check your lance settings and water pressure. Sometimes a quick tweak makes all the difference.
Weak Pressure
Weak pressure can make cleaning slow and frustrating. You might notice the foam doesn’t reach far or cover well. Start by checking for clogs or leaks in your hoses and fittings. A broken foot valve or a clogged injector tip can cause pressure loss. Spray nozzles wear out over time, so inspect them for damage. Sometimes, outside factors like dirty water or low supply pressure can also cause problems. If you hear odd noises or see leaks, look for air getting into the system. Cleaning or replacing worn parts usually brings the pressure back.
Check hoses and connections for leaks
Clean or replace nozzles and injector tips
Make sure your water supply is steady
Note: Regular checks help you spot issues before they slow you down.
Residue Issues
After rinsing, you might see streaks or patches left behind. This usually means some foam or dirt didn’t wash away. It can happen if you let the foam dry on the surface or if you missed a spot while rinsing. Always rinse from the top down and take your time. If residue keeps showing up, try using a softer water source or add a final wipe with a microfibre cloth. Sometimes, adjusting your foam mix or lance settings helps the foam rinse off more cleanly.
Problem |
Quick Fix |
|---|---|
Streaks |
Rinse again, use softer water |
Sticky patches |
Adjust foam mix, wipe with cloth |
Missed spots |
Spray and rinse more carefully |
Remember: Small changes in your routine can make a big difference in your results.
Maintenance
Cleaning After Use
You want your snow foam lance and pressure washer to last. After every car cleaning routine, rinse out the lance bottle with clean water. Spray water through the lance for a few seconds. This step clears out any leftover foam solution. If you skip this, dried soap can clog the nozzle or damage seals. Wipe down the outside with a soft cloth. Let everything air dry before you put it away. You keep your tools working well and ready for the next wash.
Storage Tips
Proper storage keeps your equipment in top shape. Store your lance, pressure washer, and accessories in a cool, dry place. Avoid leaving them in direct sunlight or damp areas. Environmental tests show that heat, humidity, and UV light can make plastic and rubber parts crack or fade. These tests, like temperature cycling and artificial weathering, help experts find the best ways to store cleaning tools. If you follow these tips, you slow down wear and stop early damage.
Keep your lance and bottles out of sunlight.
Store hoses loosely coiled to prevent kinks.
Use a cupboard or storage box to keep dust away.
Tip: Good storage habits protect your investment and make your car cleaning routine easier every time.
Regular Checks
Check your equipment before each use. Look for cracks, leaks, or worn seals. Test the spray pattern on your lance. If you spot a problem, fix it right away. Regular checks help you catch small issues before they turn into big repairs. You save time and money, and your gear always works when you need it.
Instructions and Tips
Consistent Results
You want every wash to look just as good as the last. Start by sticking to the same routine each time. Use the same snow foam solution and measure your mix carefully. Always check your equipment before you begin. If you notice a change in foam thickness, look at your water source or see if your lance needs cleaning. Keep your pressure washer settings steady. You will soon spot what works best for your car.
Top tip: Write down your favourite settings and mix ratios in a notebook. This way, you can repeat your best results every time.
Seasonal Adjustments
Weather changes can affect your snow foam routine. In summer, foam dries faster, so work in the shade and rinse quickly. In winter, foam may last longer, but cold water can make it harder to mix. Warm water helps in colder months, but avoid using water that feels hot. If you see the foam sliding off too soon, try a thicker mix. When it is windy, spray closer to the car to stop the foam blowing away.
Here is a quick table for seasonal tweaks:
Season |
Water Temp |
Mix Ratio |
Extra Step |
|---|---|---|---|
Summer |
Cool |
1:5 |
Work in shade, rinse fast |
Winter |
Warm |
1:3 |
Use thicker foam |
Windy |
Any |
1:5 |
Spray closer to car |
Experimenting with Settings
You do not have to stick with the same settings every time. Try changing the foam output or spray pattern on your lance. Test different mix ratios to see what gives you the thickest foam. If you want to try a new snow foam solution, start with the manufacturer’s instructions. Adjust slowly until you find what works for your car and your local water. Take photos of your results so you can compare them later.
If you want more tips, ask other car owners or join online forums. You will pick up new ideas and tricks for better results.
You can get great results by following a few simple steps. Start by adding the right amount of soap, fill the canister with warm water, and gently mix. Attach your lance, rinse your vehicle, then spray a thick layer of foam. Always check the product label for the best mix. Regular checks and a bit of experimenting help you find what works best. Here’s a quick look at what matters most:
Metric |
What to Watch For |
|---|---|
Sticks well, doesn’t run off too fast |
|
Coverage Efficiency |
Covers the whole vehicle quickly |
Soap Consumption |
Uses just enough, not too much |
Foam Longevity |
Lasts long enough to lift dirt |
Adjustability |
Lets you tweak for different conditions |
Tip: Always read the label and adjust your routine for your setup.
FAQ
How often should you use snow foam on your car?
You can use snow foam every time you wash your car. Most people use it once a week or every two weeks. If your car gets dirty quickly, you might want to use it more often.
Can you use snow foam without a pressure washer?
You can use a pump sprayer, but you will not get the same thick foam. A pressure washer gives you better coverage and cleaning power. If you want the best results, stick with a pressure washer and foam lance.
Does snow foam damage car wax or sealant?
Snow foam is gentle on wax and sealant. It lifts dirt without stripping protection. Always check your product label. Some strong cleaners can affect wax, but most snow foams are safe for regular use.
What should you do if the foam is too runny?
Try using less water or more snow foam solution. Check your lance settings and water pressure. Sometimes, a quick adjustment gives you thicker foam. If you still have trouble, look at the product instructions for the best mix.
Is it safe to let snow foam dry on your car?
No, you should not let snow foam dry on your car. Dried foam can leave marks or streaks. Always rinse before it dries. Work in the shade and keep an eye on the foam as it sits.
0 comments